Contributary Development Installation HOWTO
Software:- JDK
- Eclipse IDE [version 3.0 or 3.1]
- sysdeo Eclipse-Tomcat plugin [version 3.0.0]
- xmlbuddy Eclipse XML plugin (optional, but recommended) [version 2.0.9]
- MySQL
- Tomcat 5.0 (non-installer version recommended) [version 5.0.28]
- Icecast [version 2]
There are other third party software resources required, but they are checked into the repository, ready to go. The above pieces of software should be all you need prior to checkout.
[tested version] Please note: Usually the latest version should work. If there are unidentified problems - especially with Tomcat - please switch to the version we have tested.]1. Install Programs
- Install Eclipse as instructed into directory of your choice,
referred to as ECLIPSE_HOME in this HOWTO.
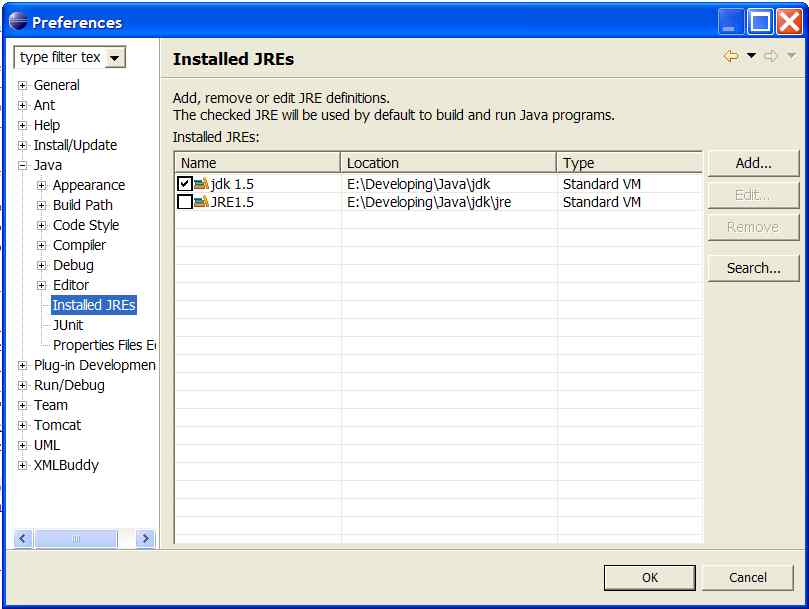
Install a JDK (a JRE is not sufficient for the sysdeo plugin!) and tell Eclipse
to use this JDK in Window - Preferences - Java - Installed JREs
- set the JAVA_HOME environment variable to the JDK directory. (Control Panel - System - Advanced - Environment Variable) To play nicely, please set your tab options to use 2 spaces per tab.
- install MySQL locally using a standard installer. Install however you like, we've installed it as a service and then forgotten about it.
- install Icecast using a standard installer.
- install Tomcat into directory of your choice, TOMCAT_HOME. We recommend using the non-Windows-installer version, as the sysdeo Tomcat plugin will handle running Tomcat for us, and having Tomcat installed as a service makes things confusing.
- install both sysdeo and xmlbuddy into eclipse using their
instructions, into ECLIPSE_HOME/plugins.
The most important steps are:- In Eclipse - Window - Customize Perspective - Command: 'Tomcat' in 'Available command groups'
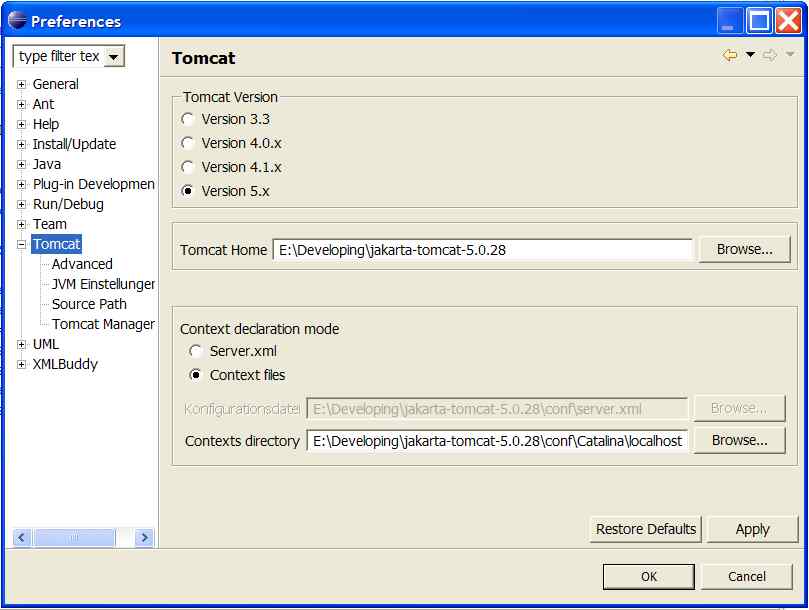
- In Eclipse - Window - Preferences - Tomcat: set Tomcat home and select context files
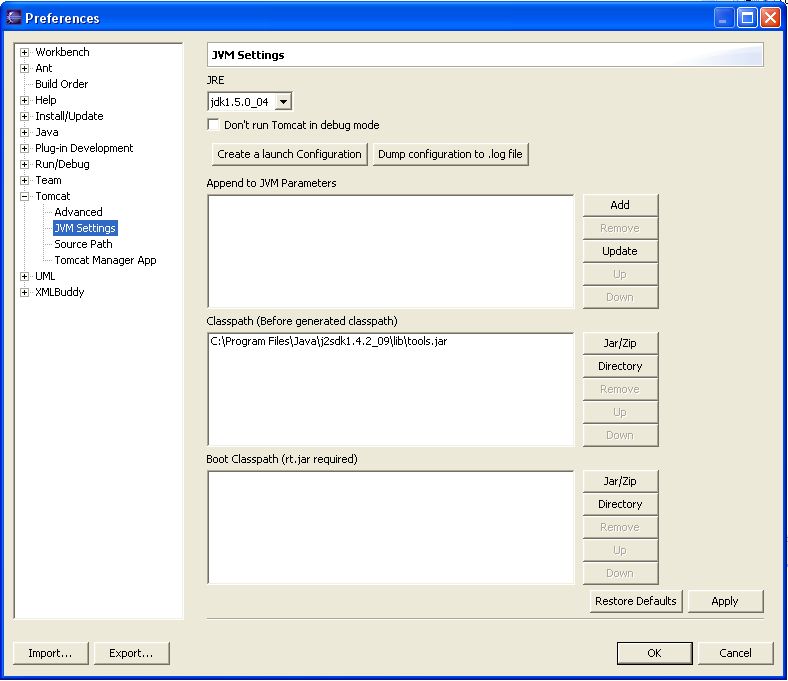
- In Eclipse - Window - Preferences - Tomcat - JVM Settings: Add 'tools.jar'
from your JDK to the Tomcat classpath
2. Checkout Contributary code
- Set up a repository in the CVS Repository view in Eclipse
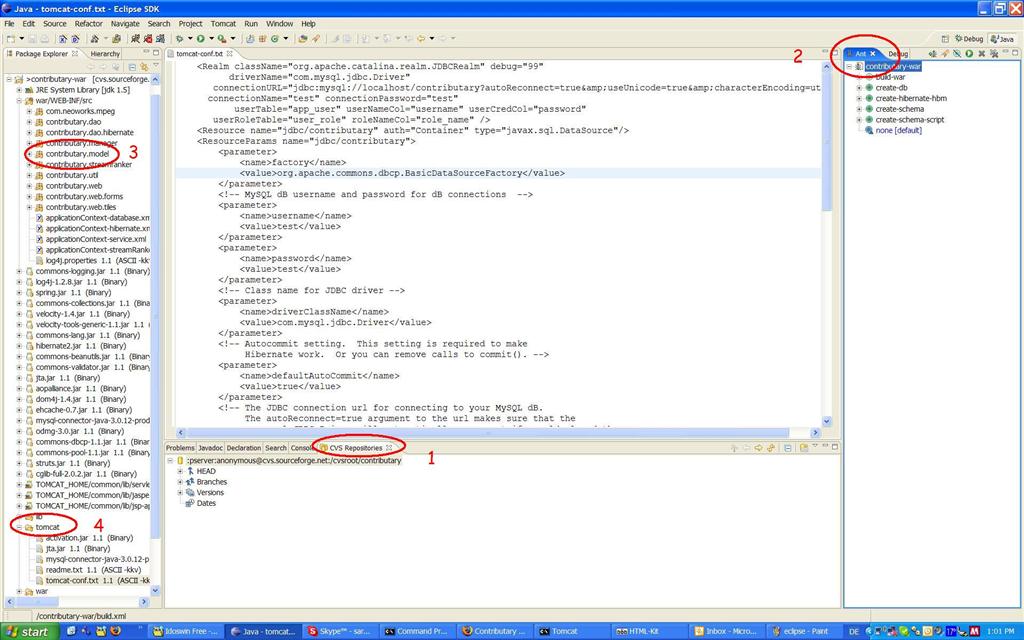
[see Eclipse window - 1] that
points to the project repository. Type in the following information:
Connection type: pserver
User: anonymous
Host: cvs.sourceforge.net
Repository path: /cvsroot/contributary - There are two modules that each become separate (but linked) Eclipse projects. First check out 'contributary-war', the web part of the project. Open the repository in Eclipse, click 'HEAD' and then right-click 'contributary-war'. Choose 'Check Out'. Put it anywhere you like, defaults are fine. The project should checkout with an Eclipse project file from the archive, and should then build without problems.
- 'contributary-war' should be set up as a tomcat project. We'll run it in the next phase of the HOWTO, below, but for now in the Java editing view right click the 'contributary-war' label in the package explorer and verify the 'Tomcat project' submenu is there.
- Now checkout 'contributary' from the CVS repository. Right-click on 'contributary' in the CVS Repository view and check it out. It should become a 'contributary' project in Eclipse and should build successfully. The 'contributary' project imports the 'contributary-war' project as a dependency, which is why we checked out 'contributary-war' first. If you check them out in the wrong order, 'contributary' will not build correctly.
Eclipse window
3. Running Contributary
- setup Ant in Eclipse:
- In Eclipse, open the Ant view in the Java perspective. [see Eclipse window - 2] Keep this around for future use; I usually put it on screen docked next to the 'Outline' view.
- Click the 'add buildfiles' button in the Ant view. Click 'contributary-war' and then select its build.xml file. This will add the ant buildfile of contributary-war permanently to the Ant view.
- Create the database we'll use in MySQL:
- do this only once:
- In the Ant view, open the contributary-war entry, and double-click on 'create-db'. This will create a database named 'contributary' on your MySQL server, and a user named 'test' to run on it. The password for this user is also 'test', but we're only authorizing this user to run on the same machine as the DB, so it can't be used remotely to compromise things. This Ant task will run unmodified if you did not secure your MySQL server; it runs under 'root' with no password. If you have secured your DB, you can override the ant properties 'create.db.user' and 'create.db.pw' by right-clicking the ant target in the Ant view and select the 'Run Ant...' option, and enter the MySQL information you've configured for your DB. You only need to do this once, even if your schema changes.
- do these steps in order every time you change your data objects and schema:
- In the Ant view, open the contributary-war entry, and double-click on 'create-hibernate-hbm'. This uses an Ant command to create Hibernate definition files from the class files committed in the repository. You should see a bunch of output in the Eclipse console, saying 'generating mapping' for files, and then it should end with 'BUILD SUCCESSFUL'.
- right click on the 'contributary.model' package in the Package Explorer under the 'war/WEB-INF/src' entry of 'contributary-war', and hit 'Refresh'. [see Eclipse window - 3] You should then see a bunch of '.hbm.xml' files. This Refresh step is required because Eclipse will then copy these files from the source directory to the output directory, which is required for the next step. Whenever you regenerate the DB, do this Refresh.
- Back in the Ant window, double-click the 'create-schema' entry of 'contributary-war'. It should show output of Hibernate generating an SQL file, and then sql commands being executed. This erases the tables in your database and recreates them, so be sure to backup data if necessary before executing this step. In addition to creating a schema, this step creates an administrator user for the application, with a username of 'admin' and a password of 'm00sic'. These can be customized using the Ant properties 'app.admin.username' and 'app.admin.password' by right-clicking 'create-schema' and choosing 'Run Ant...' in the Ant view.
- That's it, the DB is generated. FYI, the source of the DB information is embedded in the Java files of the contributary.model package themselves. Check out the files in that package and you'll see XDoclet hibernate commands that look like javadoc comments. To change the DB schema, either edit those commands, or create additional classes and comment them with XDoclet commands as well.
- do this only once:
- Run the stream server
- Start Icecast. On Win32, start up Icecast from the Start Menu and then press the big 'Start Server' button. The status bar should turn from red to green.
- In Eclipse, run the contributary.Contributary class in the 'contributary' project. You should a bunch of stream headers and metadata printed on the console, and notably no exceptions indicating that anything went wrong. The program is connecting to Icecast through localhost on port 8000, which should be the default port installed with Icecast. You can also run this class on the command line (or through Eclipse's Ant view) through the ant task 'stream-feeder' in the 'contributary' build.xml file. TODO: this needs to change to reflect the real server details
- setup the web site.
- Right-click on 'contributary-war' in the Package Explorer, and go to the Tomcat submenu. Choose 'update project in tomcat'. This will let Tomcat know about your project; this relies on the tomcat plugin knowing the correct location of Tomcat, which you should have done during installation above. This should create a 'contributary-war.xml' file in the 'conf/Catalina/localhost' directory of your Tomcat installation.
- Unfortunately, we need to customize the
'contributary-war.xml' file just created, to define a JNDI datasource
to our database, and to create a JDBCRealm for Tomcat's authentication
mechanism. Thank you J2EE and Tomcat!
- Open 'TOMCAT_HOME/conf/Catalina/localhost/contributary-war.xml' in a text editor. Change the '<Context ... />' tag to '<Context> </Context>'. Also open 'contributary-war/tomcat/tomcat-conf.txt' [see Eclipse window - 4] and copy and paste the entire contents of the file in between the Context tags in 'contributary-war.xml'. This will tell Tomcat to create a JDBC datasource pointing to MySQL; change settings accordingly if you strayed from defaults while creating the DB.
- Copy the jar files under the 'tomcat' directory under 'contributary-war' to 'TOMCAT_HOME/common/lib'. This supplies the necessary JAR files to enable the configuration changes we just made.
- In Eclipse, go the the Tomcat menu and select 'Start Tomcat' (or use the tomcat icon in the toolbar). Tomcat should start, and we should see a bunch of console messages. Make sure none of them are exceptions.
- Point a browser at http://localhost:8080/contributary-war/. A login page should appear. Enter the admin username and password (default is 'admin', 'm00sic' as detailed above).
- you're done with the installation, the web site should be running! On my nice fast workstation it takes about 15 seconds, and about 30 on my laptop. See other (as yet nonexistent) pages to see how to use and modify the application. One quick tip -- the sysdeo tomcat plugin essentially starts Tomcat in debug mode. Place breakpoints in Eclipse wherever you like, and use the web site; the breakpoints should trigger.
- Now, each time you run the website you need to
- start Icecast
- run contributary.Contributary in Eclipse
- start Tomcat
Troubleshooting
- http://localhost:8080/contributary-war/ returns blank page or error
make sure tomcat is running:- check if port 8080 is in use (Windows: console command 'netstat -a')
- try to run tomcat without using eclipse. Use TOMCAT_HOME/bin/shutdown.bat and startup.bat